The Phone Application consists of three
different screens. The Speed Dial screen is
first displayed when you insert or power up the phone. One of the
preference settings allows you to configure any one of the three
screens to be displayed as the default. Pressing the Phone
App button will cycle through these screens and is
configurable via the preferences as well. Also on the preference
screen is an option to Load CDMA time. This
feature will update the Visor's onboard clock to that of "the
highly accurate, satellite adjusted CDMA time"
maintainted by the Sprint PCS network. However, this must be done
manually. An option to update the clock automatically at regular
intervals would be a nice addition to the preferences.
The Phone Application is stored in the Digital Link's onboard
memory. It contains the Dialpad, used to make
and receive calls, Speed Dial for storing and
quick access of up to 50 numbers, and Call History
information for up to 1,000 calls.
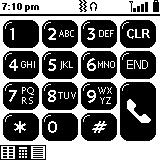
The Dialpad looks and functions like any
standard telephone keypad. There are large, on-screen buttons for
the numbers 0 - 9, *, #,
CLR, END and Talk.
The buttons are large enough to allow pressing them with your
fingertips as easily as with the stylus. Dialing is as easy as
entering a number and pressing Talk. The CLR key
functions similar to a backspace, deleting the last digit entered.
END will erase everything currently displayed.
Pressing the Talk button before entering any
other keys will bring up the most recently used number contained
in the Call History list. A second press dials
the number.
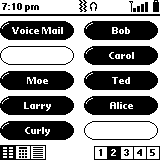
Speed Dial contains 5 pages of 10 buttons
each for a total of 50 entries. Each button displays a text label
(text entry allows up to 12 characters, however, only
approximately 10 can be displayed). Tapping the menu icon and
selecting Edit Speed Dial brings up the Speed
Dial edit screen. You can edit any entry on any page,
and even drag and drop a specific entry to another open position.
There is an automatic entry for your Voice Mail
in the first positon of the first page which can be edited or
deleted, but not moved. The Edit Entry screen
allows you to enter a Name, Number,
and Extra Digits field. You can also tap the Lookup
button to quickly extract a name and number from your address
book. The Lookup feature could use some polish...
it will only extract the First Name field from an address book
entry. Being able to select frist, last, or company name would be
more useful. For the phone number, it extracts the default
display number assigned to the entry in the Address Book. Lastly,
you can assign a specific ring tone to any specific Speed
Dial entry by selecting the Ring
checkbox and choosing one of 18 available ring tones.
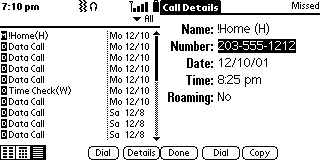
Call History maintains a log (up to 1,000
entries) of all calls made, received, or missed, but isn't as
useful as it could be. There are different icons to represent Incoming,
Outgoing, Missed, and Data
calls. For each entry, there's a details screen that will show a
phone number (if available) and an Address Book name if the phone
number is recognized as an entry in your Address Book. What's
missing is a length-of-call time. All that's maintained is the
time the call was originated. It would be useful to see the
duration of each call, possibly with total cumulative time. A
means to get the Call History list to the
desktop for viewing, printing, etc. would be beneficial as well,
especially to people using the Digital
Link for business purposes.
Address
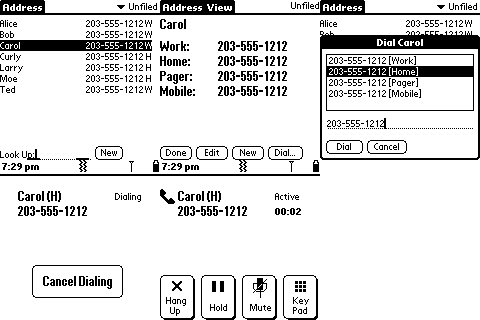
The Address application uses the standard
address database to provide the ability to select and dial any
contact you have setup. Address is virtually
identical to the standard Address application... you can add or
edit entries, and even use the look up function. Tapping on a
number brings up the Dial screen where you can
elect to dial or cancel. Tapping on a name brings up the Address
View where you can edit the entry or tap a number to
dial.
Preferences
There are numerous Phone, Sound,
Call, Security, Roam,
and Data Preferences, allowing you to configure
and customize the Digital Link.
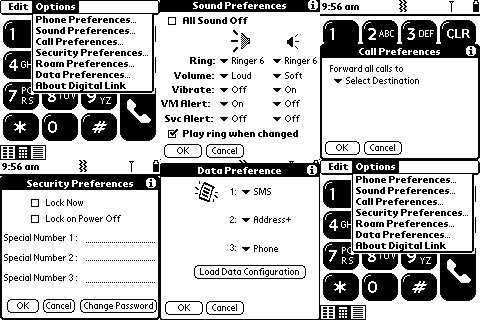
Phone Preferences allow you to configure the
default display panel shown when you start the Phone App.
You can also select which panels will display as you press the Phone
App button to cycle through them.
Sound Preferences control the settings
associated with the 2 ring profiles, selectable via the Ring
Profile Selector switch on top of the Digital Link. You can set
the ring type, volume, vibrate mode, and settings for VoiceMail
and Service alerts. There's also a check box to
turn All Sound Off.
Call Preferences enable Call
Forwarding. Specifying a number will forward all calls
to that number, whether the Digital
Link is on or off.
Security Preferences provide a way to lock
the phone (immediately or at Power Off) and specify up to 3
special numbers that can still be dialed when the phone is locked.
Roam Preferences enable or disable digital
roaming. You can specify a distinct Roam Ringer
for incoming calls and enable Call Guard, a
feature that displays a warning dialog when you attempt to place
a call while roaming.
Data Preferences are where you specify up to
3 applications that can be launched by pressing the Data
Apps button on the module. There's also an onscreen Load
Data Configuration button that will automatically setup
the Visor's Network and Modem/Connection settings.
Finally, the About... screen displays your
Sprint PCS phone number, ESN (Electronic Serial Number), and
current software version numbers.
It's a Wireless Modem >>